Showing posts with label Craft. Show all posts

Friday, 1 May 2015

Laura Ashley Knock Off

Today I would like to share with you a Laura Ashley 'Knock Off'. It's my copy of the Palladian Wooden Panel that they are selling at the moment online for £45 down from £65. I cannot remember what it was in Euros but £45 equates to about €60. My knock off was free!!

Source

Taken in Laura Ashley shop

I started with this wooden panel from an old kitchen door. I found it exactly like this lying unwanted in someone's garage, it was free to a good home!


I had to start by removing the dry glue which I presume once attached it to the door frame.


I gave it one coat of ASCP in Duck Egg blue and distressed it a little.


I then stencilled it using a sponge and some ASCP in Original.


I removed and re-stuck the stencil using some Frog tape several times until I got a result I was happy with and gave it a coat of clear wax.


 The Laura Ashley version....

Source

The Sweet Auburn version...


It's a gift for a friend who is looking for some artwork for her new duck egg blue sitting room!

Follow on Bloglovin  

Sunday, 19 April 2015

Homemade Irish Moss Topiary

This is the third instalment in the 'things I want but can't get a hold of' series. I'm not saying that I couldn't get these in Ireland but I don't want to spent €150 for a pair of them! 


So I decided I was going to have me some made by my own fair hand!
These were all the things I needed....


Two rustic looking clay pots from my local garden centre, €12 each.
Foam balls (x2), foam bricks (x2) and some moss pins (free) from the florist, €26 of total extortion.
PVA glue and a couple of bamboo sticks which I already had.
Lots of good old Irish moss from the bog which I dried in my airing cupboard! Totally FOC!!


I started by cutting one of the foam blocks in half and carving both halves up a bit so they were a really snug fit in the pots. (I actually only needed one and used half in each pot.) I gave it a smattering of PVA glue and sat a little moss on top. 


I covered the foam balls in PVA and wrapped the moss around them securing in places with a couple of moss pins. I did this in two stages, sitting them on a bowl to dry before turning over and doing the second half. The moss worked really well because it came off the bog like a piece of carpet!


Once dried, I pushed both balls onto the bamboo canes which I trimmed to size and inserted into the pots ensuring both were the same height.


There you have it, homemade Irish moss topiary. 


They are rustic looking. The moss is not as perfect looking as the Finland moss you can buy in the florist but I'm not in Finland. And I think it's in keeping with the rustic pots. 


Apologies for the photos, it was dark by the time I had finished. I like how they balance out this little vignette on my landing. I needed something on either side with a little height that wasn't a lamp. I love how they've turned out. They complete this little ensemble which has been in my head for so long. Best of all they cost me less than €50 for both.

Follow on Bloglovin  

Wednesday, 11 March 2015

Faux Vintage Chippy Window

It seems like everyone in Blogland has one. A REAL vintage window that is. 


Layers of chippy pastel paints. Small thick squares of handmade glass. Problem is I don't find them in Ireland. Maybe because we get so much rain they rot in their old abandoned houses. I have really wanted one for the top of my grandparents chest ever since I moved it to our landing. 


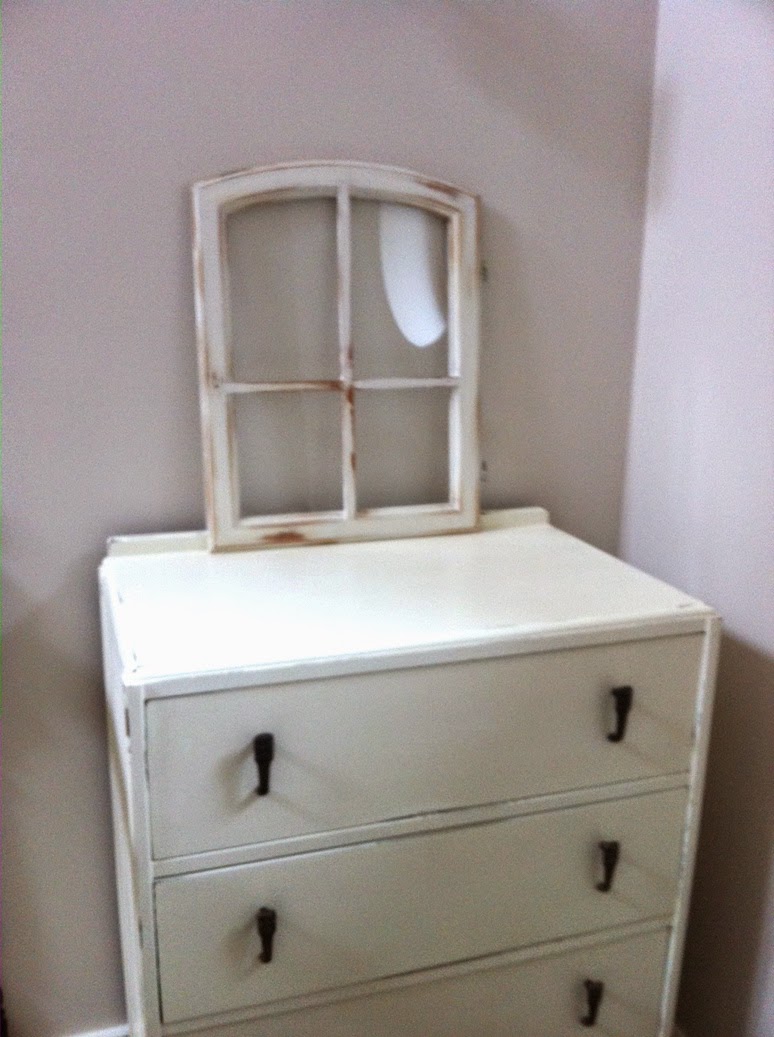
So I had to improvise. Necessity is the mother of invention you know! When I saw an old door hanging off a broken kitchen dresser I knew I was onto something. 


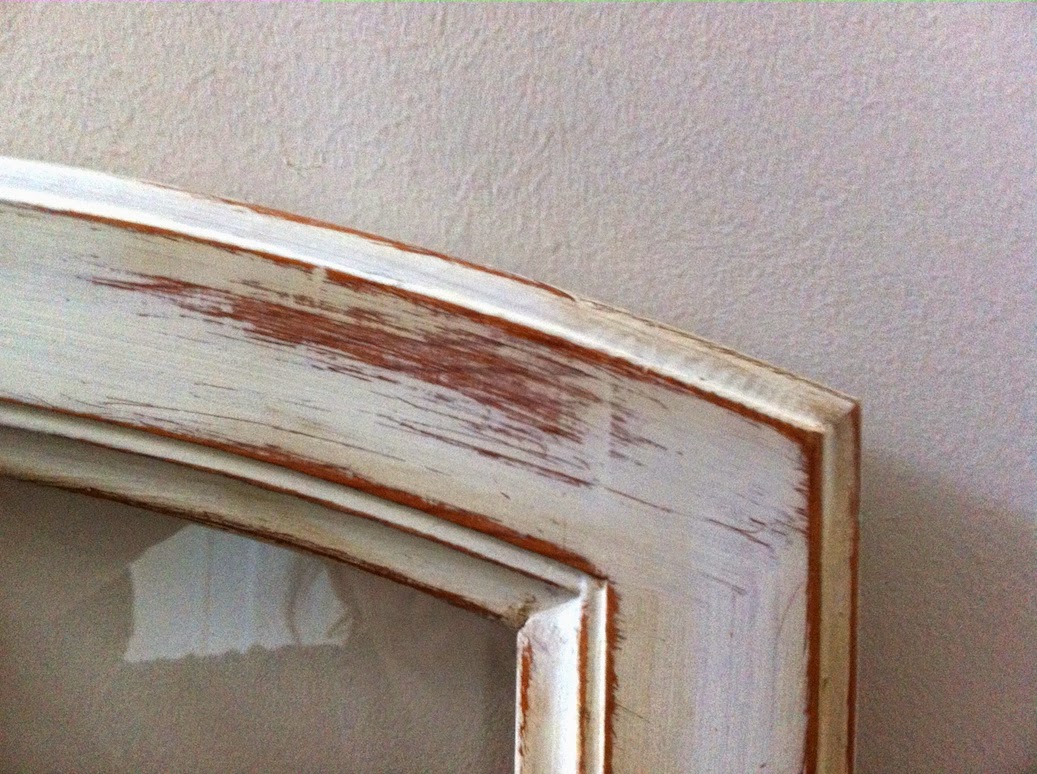
It was already missing it's knob. I carefully taped the glass and gave it one coat of Annie Sloan Chalk Paint in Original. Don't you love that orange wood?


With some heavy grit sandpaper I distressed it quite heavily, taking off lots of paint in places to give it that aged look I was after. 


A clear coat of wax followed by a hint of dark wax and it was ready to adorn my new look landing! 


Using some ribbon and a thumb tack I added a twig wreath to which I wired this little metal butterfly. It used to be a belt buckle.


I'm so happy with how it turned out. 


It's all part of a little vignette that has been in my head for almost a year now. All will soon be revealed!!

Follow on Bloglovin  

Wednesday, 31 December 2014

Horse Chestnut Series - Round Up & Chestnut Decorations

The beautiful Horse Chestnut Tree started out 2014 stark and bare.


By March the buds had appeared.


By the last day of April it had burst into leaf.


In May it was flushed with flower.


By July the pollinated flowers had turned to fruit.


In September the leaves began to change colour and fall.


By October the ripened fruit had fallen.


On a frosty December morning the Horse Chestnut stands bare once again.


Our Horse Chestnut Tree has given it's all; 
buds, leaves, flowers and fruit and so the cycle begins again.

This Christmas I wanted to use the lovely shiny conkers to make some tree decorations. 
The colour scheme in the bedroom includes hues of orange and browns from the Connemara wallpaper. 


For the first time this year I put a small tree in our bedroom.


 I wanted to keep it inexpensive so purchased a small fake tree for €12 and tried not to buy any decorations apart front the LED lights.


I made these by drilling holes through pieces of cinnamon, threaded them onto a ribbon, tying a loop at the top and finishing with a lovely shiny conker.


I dried orange slices slowly in the airing cupboard and made bows from ribbon left over from some curtain tie-backs. I bought the bird and the orange glitter ribbon to make bows and everything else was repurposed including an old bracelet!


I'm really happy with how it turned out and it's nice to have a bit of our Horse Chestnut Tree on our Christmas Tree!

Wishing you all a very happy and healthy New Year!

Tuesday, 30 December 2014

Christmas House Tour 2014

Hope you all had a very merry Christmas and that Santa was good! As I sort of threatened a Christmas House tour in my last post I thought I'd give it a go before 2014 is out. As I said, I started decorating early this year...and finished late! 
Ah the best laid plans...

O Christmas Tree!

I started out totally inspired, ready to deck those halls a little differently this year and have all done by our anniversary (a week before Christmas) so I could relax and enjoy thereafter. I ended up rushed, exhausted and surrounded by boxes, adding and tweaking until it was Christmas Eve! There has to be a better way - which I have to figure out before next year!! Suggestions welcome!

Some newly gifted additions to the tree this year

This one came all the way from Germany

This one came from Marks&Spencer

Decorating drama aside, I am pretty happy with how it turned out. So using my super duper new Christmas present from Mr. Auburn (a new camera!) and my usually crappy photography skills;
here are some pictures of our home at Christmastime....

Fireside is blazing bright...

Our Mantlepiece


Our coffee table


Even rabbit can't escape 

The baby Jesus in the manger

Christmas in the Kitchen...


This little guy got a new eau de nil hat and scarf for Christmas


Deck the Halls...


Sleigh Bells Ring!

 This sleigh was a market find last year and last Christmas I laid it down in the front hall and piled Christmas presents on it. This year I decided to upturn it and add another vintage find from the same market this summer. The chance of finding a sleigh and ice skates in a market in the Midlands of Ireland must be like winning the lotto! I trimmed the top of the skates with fur I bought at a craft shop (the extra trimmed the tiny stockings on the tree in the kitchen window). Added some greenery and a sleigh bell of course and I love it!


Our stair garland

Top of the stairs

I am a huge Norman Rockwell fan and have been lusting after this print, Home for Christmas, for so long. This year I found it for sale on eBay and Mr. Auburn made it mine. 
I LOVE IT!
As it is quite long and narrow, I tried to balance it with a fresh wreath of fir and bay.


And a Partridge in a Pear tree!

 I had this idea for a long time and just executed it last year for the first time. I had sourced a partridge on eBay but lets say he wasn't exactly glamorous! He looks better on the more rustic kitchen tree. I searched for so long for pears and eventually found them in TK Maxx and sourced a better looking 'partridge' from Gisela Graham.

And to think in just a couple of days it has to all come down again!

You might also like...

Related Posts Plugin for WordPress, Blogger...